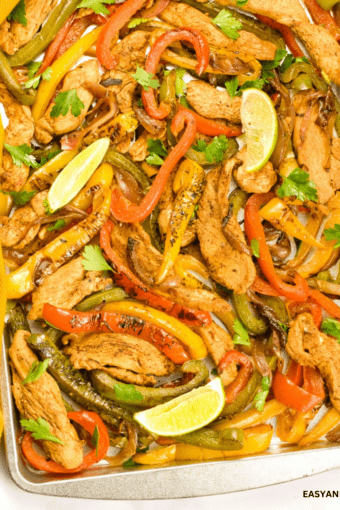
Keto Chicken Fajitas
Equipment
- 1 large mixing bowl
- 1 whisk
- 1 cutting board
- 1 Chef's knife
- Measuring spoons
- 1 large skillet
- 1 tongs
- 1 Serving platter, or sheet pan
Ingredients
- 3 tablespoon lime juice or lemon juice
- 4 tablespoon olive oil 2 for the marinate, 2 for cooking the chicken and vegetables, or other vegetable oil with high smoke point such as avocado oil
- 2 teaspoon chili powder
- 1 teaspoon ground cumin
- 1 teaspoon sweet paprika or smoked paprika if you prefer
- Salt and pepper to taste
- 3 large chicken breasts or thighs, skinless and boneless, sliced into thin strips (600 grams )
- 3 medium bell peppers 1 red, 1 green, and 1 yellow, de-seeded and sliced into thin strips
- 1 medium red onion sliced into thin strips (or white or yellow onion)
- ¼ cup cilantro chopped (or parsley if you are not a fan of cilantro)
Instructions
SKILLET CHICKEN FAJITAS (STOVETOP)
- Prepare the marinade: In a large bowl, whisk lime juice and 2 tablespoon olive oil together. Mix in chili powder, ground cumin, paprika, salt, and pepper.
- Toss the chicken strips until coated evenly in the marinade. Cover the bowl with plastic wrap and let marinade in the fridge for 30 minutes.
- While the chicken is marinating, slice the bell peppers and onion into thin strips (about ¼-inch thick).
- Heat a large nonstick skillet over medium-high heat, add 1 tablespoon olive oil, and then the sliced onions and peppers. Stir now and then and cook for about 5-7 minutes or until the vegetables are slightly softened and charred. Transfer to a sheet pan or serving platter.
- Remove the chicken strips from the marinade and shake off any excess marinade.
- Using the same large skillet, add 1 tablespoon olive oil and cook the strip over medium-high heat for about 5-7 minutes, or until the chicken is golden brown and cooked through.
- Transfer the chicken fajitas to a sheet pan or serving platter and mix them with the cooked vegetables.
- Sprinkle chopped cilantro over the top of the fajitas, and serve with tortillas, sour cream, salsa, and any other toppings of your choice. Enjoy!
SHEET PAN CHICKEN FAJITAS (OVEN-BAKED)
- This is an alternative cooking method. To make oven-baked chicken fajitas, follow steps 1 and 2 above.
- After the chicken has marinated for 30 minutes, discard the marinade and transfer the chicken and vegetables to a large sheet pan lined with aluminum foil. Toss them with 2 tablespoon olive oil and spread out everything evenly.
- Bake at a preheated 400 degrees F (200 C) oven for 35-40 minutes, stirring once halfway through. Squeeze extra lime juice over top of the meat and vegetables after they come out of the oven and sprinkle cilantro on top.
- What cut of chicken is best for these keto chicken fajitas?
- You can use either chicken breasts or thighs that are skinless and boneless. The most important is to cut the chicken evenly into long, thin strips. This way they will cut uniformly!
- How to cut a chicken breast into strips
- Start by removing any excess fat (or skin) from the chicken breasts or thighs with a sharp knife.
- Place the chicken breasts on a cutting board and cut them lengthwise into thin, even strips. You can cut the strips as thick or thin as you prefer. However, cut them into a uniform thickness so that they cook evenly.
- If the chicken breasts are large, you may need to cut them in half horizontally and then slice them lengthwise.
- Once the chicken is sliced into strips, you can proceed with marinating and cooking it according to our recipe instructions.
Recipe Notes
- FRIDGE: Let your leftover fajitas cool down to room temp before storing them in an airtight container in the fridge for up to 3-4 days. The airtight container will prevent them from drying out or absorbing odors from other foods
- REHEAT: Either microwave them or heat them up in a pan on the stove over medium heat.
- FREEZER: You can freeze our keto chicken fajitas in an airtight container for up to 2 months. Then, thaw them in the fridge overnight and reheat them before serving. However, the vegetables won't be as crunchy as they were at first.
Nutrition
** Nutrition labels on easyanddelish.com are for educational purposes only. This info is provided as a courtesy and is only an estimate, since the nutrition content of recipes can vary based on ingredient brand or source, portion sizes, recipe changes/variations, and other factors. We suggest making your own calculations using your preferred calculator, based on which ingredients you use, or consulting with a registered dietitian to determine nutritional values more precisely.
Please note that health-focused and diet information provided on easyanddelish.com is for educational purposes and does not constitute medical advice, nor is it intended to diagnose, treat, cure, or prevent disease. Consult with your doctor or other qualified health professional prior to initiating any significant change in your diet or exercise regimen, or for any other issue necessitating medical advice.
