Portuguese corn bread is an easy and traditional recipe, very popular in Portugal and Brazil which can be served with Portuguese kale soup (caldo verde).
What happens when a self-confident cook acts impulsively? Well, see for yourself.
This is my story about making Portuguese Corn Bread or Broa de Milho, for the very first time, after sleep deprivation and a very tiring morning.
It is not certainly my first time enjoying this Portuguese treat, which is so well-appreciated in Brazil that we ended up Brazilianizing the recipe. The addition of fennel seeds is a clear example of this as well as guava paste (sweet version). However, as you will see, it is my first time actually baking Portuguese corn bread ( Broa de Milho) , and an experience that I will never forget...
It started the night before, when I spent an eternity choosing a good recipe for Broa de Milho from among many others that, honestly, left a lot to be desired. Some contained obvious technical mistakes, while others were vague in their directions. How I detest this sort of recipe!
After selecting the recipe, it was already getting into the wee hours of the early morning. Time to go to sleep. A few hours later, the alarm clock loudly announced that it was time to wake up, make all the necessary arrangements to get my children ready for school, and drive to take care of some errands.
Several hours later, when I finally set foot in the kitchen I was exhausted. But I was going to make that bread, come what may.
It was already too late when I realized that I had forgotten to add the salt into the yeast-water-sugar mixture. By that point, I had already mixed all the ingredients together and kneaded the dough. "What to do now?" would have been a reasonable question to ponder, before acting on impulse. But I didn't stop to think.
What did I do instead? Oh, I simply added the salt ( 1-½ Tablespoon of salt instead of 1-½ teaspoon) to the plain dough without even considering the more sensible option of dissolving it first in a bit of lukewarm water. Now not only was the dough too salty, but its texture had changed, also.
OK, I was about to scream at myself, when suddenly I had the "brilliant idea" of balancing out the faulty extra saltiness of the dough with sugar. Yes, let's balance the salt with sugar. My thought was this: since I added about 3 times more salt than the recipe asked for, let me correct that mistake by adding 3 times the amount of sugar in the recipe. Ho, ho, that was exactly what I did. No matter how much I kneaded, a very granular dough was what I got. No surprise there!
"You know what, let me just make the dough over again," I told myself.
But I was nearly out of yeast, of course, and had no time to go to the supermarket. So I finally said to myself, just loosen up a bit and enjoy the ride-- after all, nobody else is here to yell at you -- I was thinking how blessed I was not to be in a bakery or restaurant kitchen at this moment. I looooove baked goods. I kind of enjoy baking, although I am not a pastry chef. But this bread was fast becoming the product of a confused mind combined with frustation, which is a recipe for disaster. I was too stuborn to admit it!
I still waited for the dough to double after the first hour. It didn't. The temperature here has been pleasant -- far from warm. "So then let me put the dough in a very slightly heated oven...." It helped a bit, but did not resolve the problem. It was time to pick my children from school. I did... and stopped by the supermarket, too. I knew that I needed to remake the dough.
I was too curious about how disastrous the original dough would turn out to just throw it away. I said to myself: "Denise, since you cannot enjoy eating it, permit yourself at least to have a good laugh, accompanied by some useful lessons. I got-- both! Oh, how I needed that laugh. Life is too short to take things so seriously all the time. Don't you agree?
To complete the circus, I also forgot to place a deep baking tray under the tray that held the loaves.... How wonderful!!! Please, see for yourself:
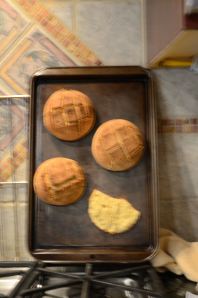 I promise you: I did not glue the loaves onto the pan...
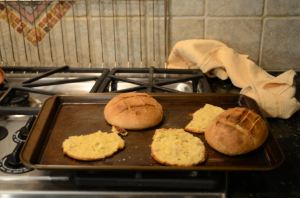
I had to use all my strength to pry the rocky loaves from the tray. No problem! My little one quickly found what to do with them: she rolled them around on the floor. :):):)
So when you go to the kitchen, don't act like a fool (me). Be rested and focused, unless you need a good laugh. Remember: the final result depends on all the little details.
I can be very obstinate sometimes, so a few hours later I remade the bread -- this time a bit different from the original recipe. I used 3 cups of all-purpose flour (instead of 4), and 3 of cornmeal (instead of 2). I also added 2 additional tablespoons of butter, paid attention to the important details, and made a few adjustments. It was in this way that I finally got the Portuguese corn bread loaves right!
Now I can say "Enjoy our Portuguese corn bread!" instead of only "Have fun!!!"
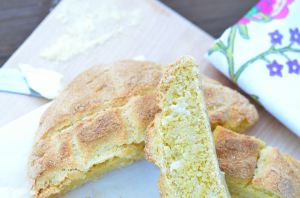
Portuguese Corn Bread (Broa de Milho)
Ingredients
- 1 cup lukewarm water 110º to 115º F or 43º a 46º C
- 2 tablespoons active dry yeast
- 1 tablespoon crystallized sugar
- 3 cups all purpose or bread flour plus extra for dusting (about ½ to ¾ cup)
- 3 cups stone ground yellow cornmeal
- 1 - ½ teaspoon salt
- 5 tablespoon unsalted butter at room temperature (for a Vegetarian and Dairy-free version, use vegetable oil instead)
- 1 cup milk warm (for a Vegetarian and Dairy-free version, use water instead)
- 3-4 tablespoons fennel seeds optional (I prefer mine without. You can use dried rosemary instead, if desired)
Instructions
- First, stir the dry yeast with the sugar into 1 cup of lukewarm water. Keep aside for approximately 5 to 10 minutes. The mixture will turn a bit foamy.
- Meanwhile, in a large bowl, mix the flour, the cornmeal, salt, butter or oil, and the fennel seeds (optional). Pour the yeast mixture and the other cup of lukewarm water or warm milk over the flour/meal and butter/oil mixture. Mix everything together and knead -- scraping everything from the bottom and sides of the bowl-- until obtaining a homogeneous and sticky dough. Cover the bowl with a kitchen towel and store in a warm place for 60 minutes, permitting the dough to rise. I stored mine in a very lightly warm oven, which I had preheated to a low temperature for a few minutes and then turned off.
- After 60 minutes, punch down the risen dough to release the air, dusting with the extra all-purpose or bread flour little by little and kneading slowly. Make 4 round loaves from the dough. Flatten a bit (the dough will be soft and elastic but not that sticky anymore, permitting it to be formed into balls). Place the loaves on a baking sheet lined with parchment paper, cover with a wet kitchen towel, and let the loaves rest for an additional 60 minutes in a warm place.
- Preheat the oven to 450º F (230º C).
- Remove towel, make both lengthwise and crosswise slashes on the top of each loaf with a sharp pairing knife-- like a checkboard-- and place the loaves onto the middle rack of the oven.
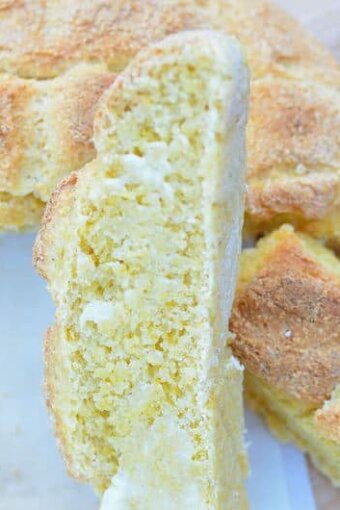
- Before that, place a deep baking tray filled ⅓ full with boiling water on the bottom rack of the oven to recreate the steam of the Portuguese brick ovens. Bake for 22 to 25 minutes or until the crust of the loaves is browned and firm. It is a hard crust bread with soft, dense-textured interior.
- Serve warm with butter or with a bowl of Portuguese Kale Soup (Caldo Verde).
** Nutrition labels on easyanddelish.com are for educational purposes only. This info is provided as a courtesy and is only an estimate, since the nutrition content of recipes can vary based on ingredient brand or source, portion sizes, recipe changes/variations, and other factors. We suggest making your own calculations using your preferred calculator, based on which ingredients you use, or consulting with a registered dietitian to determine nutritional values more precisely.
Please note that health-focused and diet information provided on easyanddelish.com is for educational purposes and does not constitute medical advice, nor is it intended to diagnose, treat, cure, or prevent disease. Consult with your doctor or other qualified health professional prior to initiating any significant change in your diet or exercise regimen, or for any other issue necessitating medical advice.
Recipe based on Pryia Easy and Tasty Recipes blog.




Philomena says
Hi Denise, can a bread machine be used to make this bread?
Denise Browning says
Hi, Philomena! I have never tried to make this bread in a bread machine. It would have to be a recipe specifically designed for it. Adjustments to ingredients and cycles may be necessary depending on your specific bread machine's capabilities.
Cynthia says
Denise,
adoro ler suas receitas! Me identifico muito com o fato de vc odiar receitas sem instrucoes detalhadas e claras! Tb me sinto assim, fiquei ainda mais picky depois que me vim morar nos EUA! rs Tb adoro aprender o significado de algumas palavras (ingredientes) que ainda desconhecia, como fennel seed (erva-doce) e rosemary (alecrim seco)! Muito bom! Seu ingles é bom demais! Parabens pelo ingles, pelas receitas, e pelo seu bom humor! Bjs! 🙂
Denise Browning says
Cynthia: Muitíssimo obrigada, querida! Gentileza sua. Depois que vim morar aqui nos EUA e me formei como Chef, fiquei mais picky ainda também. Quando começo a ler receitas vagas, paro logo. Por isso, tento detalhar as minhas ao máximo. Acho que informação nunca é demais. Espero que você volte a visitar FBTY e ,se tiver qualquer dúvida, é só perguntar. Ficarei feliz em ajudar. Uma boa semana pra você!!!
adele says
Hi Denise, boa noite.
Eu tenho uma pergunta: Voce em nenhem momento falou em sovar a massa de broa.. E assim mesmo ou ficou faltando essa explicacao ? Please, let me know if am wrong or not. Thanks a lot. I just found your blog and I truly loved it.
Adele from Lake Worth, Florida
Denise Browning says
Adele: Thanks for visiting From Brazil To You. We are happy to have you here! In the second paragraph of the recipe directions, I have talked about kneading the dough (sovar a massa):" knead — scraping everything from the bottom and sides of the bowl– until obtaining a homogeneous and sticky dough." A receita em portugues tambem fala de sovar mas usando um outro termo que eh amassar: " misturando e amassando tudo bem até obter uma massa homogênea e macia." Sim, a massa tem que ser sovada, mas somente o suficiente para obter uma massa homogenea. O tempo de descanso da massa eh importante tambem para que ela cresca. Espero que voce goste dessa broa, a qual eh a favorita do meu marido. Voce podera fazer uma broa grande ou dividir a massa em varias porcoes menores para obter varias broinhas (essa eh a minha preferencia embora para o blog eu tenha feito uma broa grande). Eu tambem prefiro a minha sem fennel. Adoro plain ou com goiabada. Mas isso eh a minha preferencia pessoal. Fica a vontade pra colocar o que voce preferir. Um bom verao!!!!
Sofia Newton says
Denise, as I read about your experience, it gave me a good laugh as well! I could see your girls playing with it on the floor! Laughing at one's imperfection takes a heart that is willing to learn. Good for you! Thanks for the pics.
Denise Browning says
Thank you, Sofia, for stopping by! I am glad that you did laugh...Every single time that I remember what happened that day, I still laugh a lot.
Erika says
Cornbread is one of my favorite foods and though this doesn't look like what I traditionally think of as cornbread, it looks delicious!
Denise Browning says
Thanks, Erika! My husband doesn't like cornbread but this one he eats and asks me for more. 🙂 I love cornbread - the Brazilian, Portuguese, and American one too... I am a corn lover!!! xx
Brooke says
I've got study a few of the posts on your blog now, and I adore your style of writing a blog. I included it to my favorites web site list and will be looking at back again shortly.
Denise Browning says
Thanks a lot, Brooke! I hope you can visit us here again and again. x
Anonymous says
Good day! Do you use Twitter? I’d like to follow you if that would be okay. I’m undoubtedly enjoying My first time making Portuguese Corn Bread (Broa de Milho): A providential disastrous experience… | and look forward to new posts…
Denise Browning says
Yes, I have. It is under frombraziltoyou on twitter. I'd be glad if you follow me. Have a great weekend!